Overview
在前面的示例中,我们展示了如何读和writegroov查看数据存储标签。现在,让我们利用基本知识和节点红的一些力量来做一些有趣的事情。
此示例将从Weather Autherground获取当前的天气数据,并将其显示groovView.
步骤1-将新的数据存储和标签添加到groov查看项目
保持你的groovView project organized, add a new Data Store device to yourgroovView project:
- Opengroov查看并进入构建模式。
- In the Gadget Palette, on the Tags tab, click Configure Device and Tags to open the “Configure Device and Tags” view.
- Click Add New Device and select Data Store from the menu.
- For the name, enter
WeatherDataStore。 - Click Create to create the Data Store.

Now add some tags.
- Make sure that the “WeatherDataStore” Data Store is selected.
- 单击配置标签以打开“配置数据存储标签”视图。
- Add the following tags:
- String tag named
(健康)状况 - Decimal Number tag named
temperatureC - Decimal Number tag named
temperatureF - Decimal Number tag named
wind
- String tag named

Create agroovView page with gadgets using the new tags. For example:

步骤2-创建一个天气地下帐户
Weather Undergroundhas anAPI这为开发人员和应用程序提供了天气数据。有一个免费的选项,可让您每天提出500个请求,并且可以购买其他计划。
In this example, we’ll use the free plan to move some current weather data intogroovView.
首先,您需要一个天气地下帐户。您可以注册这里为您的免费帐户。在向Weather Underground Service请求时,将为您提供一个API键。
Step 3 - Install Weather Underground Nodes for Node-RED
有一个可用于节点红色的软件包,可以访问Weather Weather Underground API。叫做node-red-node-weather-underground它的首页是这里。
To install the node in Node-RED 0.15.2 or newer:
- 确保您的节点红色运行时可以访问Internet。
- 如果您在A上使用节点红groov史诗处理器或groovEdge设备,然后设备在安装节点时必须能够访问Internet。有关此的详细信息groov史诗般的故障排除和groovEdge Appliance Troubleshootingsections.
- Node-RED will also need to be connected to the Internet to use the Weather Underground API, which is an online web service.
- Open the Node-RED editor in your browser.
- Under the menu, select the管理调色板menu item. This will open the “Manage palette” view.
- Click the Install tab.
- 在搜索字段中,输入“天气”并向下滚动以查找node-red-node-weather-underground。
- 点击安装按钮node-red-node-weather-underground。需要花一些时间来处理。
- Click Done to close the管理调色板view.
- The weather Underground nodes should now be in the list of available nodes, probably near the bottom.

步骤4-测试天气地下节点
Before connecting the weather data togroovView, first just try the nodes and see how they work.
- 在Node-Red中,将注入节点拖到流程上。
- 拖出一个Weather Underground function node. Make sure you grab the one with a port on each side of the node.
- 拖出一个Debug node.
- Connect the Inject node to the Weather Underground node, and then that to the Debug node.
- Double-click on theWunderground节点以打开“编辑Wunderground节点”视图。
- 进入城市和国家或美国州。
- Enter your Weather Underground API key.
- 单击完成。
- Click Deploy.
- Make sure the Debug tab is viewable in the right-hand sidebar.
- Click the Inject node’s button (the square on the left-side of the node).
- 在“调试”选项卡中,您应该看到这样的条目:

That’s the content of the response from the Weather Underground API.
It means thatmsg.payload包含一个带有某些属性和值的JavaScript对象,如API和节点所定义。重新格式化以轻松阅读,看起来像这样:
msg.payload = {“天气”:“ clear”,“ tempk”:297.2,“ tempc”:24,“ tempf”:75.2,“湿度”:“ 21%”,“ windspeed”:0,“ windDirection”301,“位置”:“加利福尼亚州特米库拉商业园”,“ epoch”:“ 14822274378”,“描述”:“坐标的Temecula的天气:33.49000168,-117.15000153是透明的,”星期二:阳光和云层混合。高24c。风能变动。”};味精is a JavaScript object, with a property named “payload”.味精objects are what Node-RED passes between nodes.msg.payloadis a JavaScript object, with various properties.- 消息有效载荷在节点红色中非常普遍。默认情况下,大多数节点都会读或写入
msg.payload。 - Some nodes will let you use other objects or properties, while some simpler nodes only use
msg.payload。
- 消息有效载荷在节点红色中非常普遍。默认情况下,大多数节点都会读或写入
msg.payload.weather是描述当前天气条件的字符串。msg.payload。tempf是当前温度以华氏度为单位的数值。
Using this information, we can now connect the data intogroovgadgets.
步骤5-将电流温度连接到groovView Node
- 拖出一个groovView Write node.
- 将天气地下节点的输出(即右侧端口)连接到输入groovView Read node.
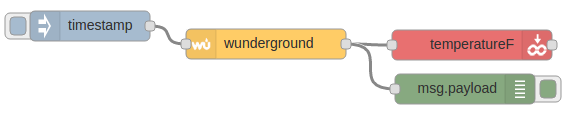
- Double-click on thegroov查看写节点以打开“编辑groov写入节点”视图。
- 由于我们在groovView, we need to configure it in Node-RED too.
- In the Data Store field, with “Add new groov-data-store” selected, click on the pencil icon.
- Add a Data Store named
WeatherDataStore。It must exactly match the name in thegroovView project. - For the Tag Name field, enter
temperatureF。 - For the Value field, select “msg.”, and then enter
payload.tempf。这将告诉节点使用该属性msg.payload。tempf, which as we saw in the previous section, contains the current temperature.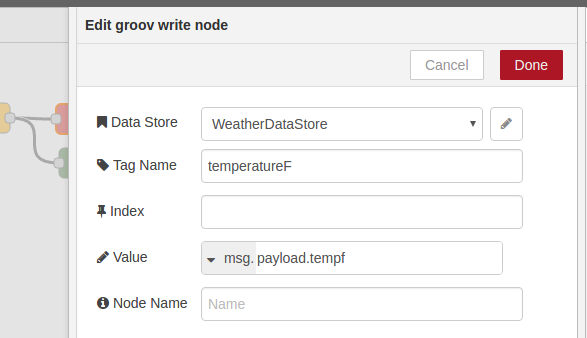
- 单击完成。
- Click Deploy.
- Click the inject node’s button
- Go togroovView and see the temperature value in the gadget.


Step 6 - Connect Additional Weather Data
以类似的方式,您可以将其他数据连接到附加groov标签。
- Drag out two moregroovView Write nodes.
- Connect the output of the Weather Underground node to each newgroovView Write node.
- For the first new node, configure these fields:
- 数据存储:选择现有的WeatherDatastore配置。
- Tag Name: enter
(健康)状况。 - Value: select “msg.” and enter
payload.weather。
- For the other new node, configure these fields:
- 数据存储:选择现有的WeatherDatastore配置。
- Tag Name: enter
wind。 - Value: select “msg.” and enter
payload.windspeed。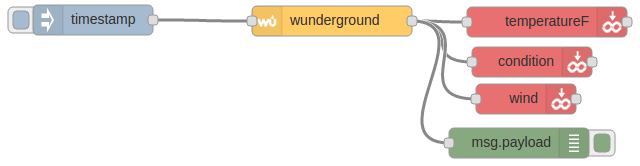
- Deploy the flow and try it out.

Step 7 - Periodically Update Weather Data
The free Weather Underground API plan allows for 500 API calls per day. If you’re only requesting data for one city from one device, that comes out to a request every three minutes.
The Inject node has several options for periodically injecting messages into the flow. We can use it to periodically refresh the weather data and keep the data ingroovView fresh.
- Double-click on the Inject node to open the “Edit inject node” view.
- For the Repeat field, select “interval” and enter a value of 5 minutes or greater. This will keep your Weather Underground API requests well within the 500 requests-per-day limit.
- For the Name field, enter a useful name like “Every 5 minutes”.
- 单击完成。
- 删除调试节点,因为您可能不再需要它了。

- Click Deploy. The weather data will now be refreshed every three minutes.

If you’d like to get data for additional cities, you can either make less-frequent requests, or purchase an appropriate plan from Weather Underground.

结论
This concludes our Getting Started with Node-RED forgroov查看部分。
There’s also a quick introduction to Node-RED on the official website, with tutorials for a第一的和第二flow.
请探索Opto 22开发人员网站上可用的其他材料以获取更多信息,包括Node-Red的部分资源。